Showing posts with label Main Dish. Show all posts

Wednesday, December 31, 2014

Wine-Braised Beef - 2 ways

I grew up in a meat and potatoes family, my husband is Italian. Roasts were a regular part of the menu plan growing up. Typically they were prepared simply, roasted in the oven and served with delicious pan dripping gravy and mashed potatoes and a side of some vegetable. When I tried to make a roast for my husband, he wasn't really into it. This bummed me out, I certainly couldn't make a 2-3# roast for myself. I would have to eat it for weeks. Despite this, a few weeks ago when the chuck roasts were on a BOGO sale, I picked two up.

I started searching for some recipes that I thought could work for my husband. I found a recipe that used a Wine-Braised Beef in a Shepherd's Pie. I made some simple adjustments, but mostly followed the braised beef portion. I wanted to keep it simple, so I made the beef, the potatoes and the peas and we built deconstructed Shepherd's Pie...especially important for me who doesn't eat peas. My kids didn't care for the Shepherd's Pie approach, so we came up with a sandwich that was similar to the Mongolian Beef with Spicy Mayonnaise that we had experienced at the Epcot Food and Wine event...not a perfect match, but we hadn't found any other options.

Wine-Braised Beef
Ingredients:
2 pounds beef chuck pot roast cut into big hunks
salt
pepper
2 tablespoons olive oil
1 large carrot
1 stalk celery
1 large shallot
2 tablespoons flour
2 cups sherry
15 ounces beef broth
3/4 cup water

Directions:
Heat oil in a large heavy-bottomed pot over medium-high heat. Season beef on all sides liberally with salt and pepper then place inside pot and sear for 3-4 minutes on the top and bottom, until a golden brown crust has formed. Add carrots, celery, and shallots then cook until vegetables are tender, 6-8 minutes. Sprinkle in flour then stir and cook for 1 more minute.

Pour in sherry, beef broth, and water then bring to a boil. Place a lid on top of the pot then turn heat down to medium-low and simmer for 2 - 2-1/2 hours, or until beef can be easily shredded, turning beef over halfway through. Remove meat then shred. If liquid is not thickened, turn heat up and simmer until thickened then return beef to the pot.

To make deconstructed shepherd's pie, prepare mashed potatoes and peas. Assemble in a dish, layering the beef, the peas and the potatoes.
To make braised beef sandwiches, prepare some siracha mayonnaise (1/2 c mayo, 1-2 tbsp siracha) and serve beef on a roll, with a smear of the siracha mayonnaise.

Disclaimer

Sunday, October 5, 2014

Chicken and Waffles

Friday night, we went out to dinner as a family at a newer restaurant that our friend opened. We had been there once for dessert and once for dinner in the past and on the way there, my son shared that he wanted to order the Chicken and Waffles. Unfortunately, they were not part of the dinner menu, but part of the brunch menu, so he couldn't order them.

This weekend, in an effort to clean out the pantry and organize a little, I had cleaned up my baking shelves and realized that I had a couple of pancake/waffle mixes that I needed to use. So, when I sat down to plan the menu for this week, I decided to try making Chicken and Waffles for dinner one night. I did some searching and saw many examples of what I expected, a fried chicken chunk on a section of waffle or a fried chicken breast sandwich with waffles as the bun. I saw one post where the chicken was skewered and cooked in the waffle. I decided that this approach was the one that intrigued me the most. I decided to forgo the skewers and to fry the chicken rather than bake it, but I did elect to make the dip.
The result was great. The crisp of the fried chicken was lost for the most part in the waffle - I'm guessing that the waffle batter soaked into the crust, but the flavor was still there. I had made my pieces small enough that most of them only took up one quadrant of the waffle maker, which was a nice size to eat them as a finger food or to cut them up to eat with a knife and fork. The dip was really good - the combination of the spicy mustard and the sweet of the maple syrup was nice. In fact, we had extra and decided that we would keep it for dipping other things in this week. This dish was declared a keeper.

Chicken and Waffles
Fried Chicken
2 boneless chicken breasts
2 eggs
3 tablespoons milk
1 salt
1 pepper
1 cup crushed corn flake
1 cup bread crumbs
2 tablespoons canola oil

Waffle Batter
2 cups Pancake Mix
1 1/4 cups water
1/4 cup canola oil
1 egg

Maple Mustard Dip
3/4 cup light mayonnaise
1/3 cup maple syrup
3 tablespoons Ballpark mustard (could use a Dijon or Spicy mustard)

Directions:

Preheat oven to 300 degrees.

Cut the chicken breast in half (wanted to say lengthwise, what I mean is butterfly), then cut into pieces.

Whisk together 2 eggs and milk. Add the cut up chicken.

Place the oil in a frying pan and put on medium-high heat.

Place crushed corn flakes and bread crumbs on a plate. Add seasoned salt and ground chipotle pepper. Coat the chicken breast in crumbs. Place into frying pan, turning once, cooking until chicken is cooked through. Remove to a plate.

Preheat waffle iron.

Prepare waffle batter by combining the waffle mix, water, oil and egg.

Dip chicken into waffle batter then place on waffle iron (I spray mine with cooking spray).
Place in pan in oven to keep warm while you cook the remaining waffles.
Prepare dipping sauce by whisking together mayonnaise, maple syrup, and mustard.

Serve chicken waffles with dipping sauce.


Disclaimer

Thursday, July 31, 2014

Ginger Soy Tilapia

At our house, we are always looking for new ways to enjoy fish prepared at home. Recently, I found a new alternative for Tilapia, which is one of our go to fish. We like that tilapia is a nice mild, white fish. It works well in many recipes and is not 'fishy' tasting. Both of the kids enjoyed this preparation and I was told I could make it again.

With the preparation inside of foil pouches, this meal could also be prepared on the grill. We enjoyed it with a side of corn and rice.

Ginger Soy Tilapia
Ingredients:
4 fillets (4 oz each) tilapia fillets
1/4 cup ginger soy sauce (or 2 Tbsp freshly grated ginger and 1/4 cup soy sauce)
2 teaspoons sesame oil
1 pepper

Preheat oven to 425F.

Tear off 4 pieces of foil. Place a tilapia fillet in the center of each piece. Drizzle each with ginger soy sauce and sesame oil. Season with pepper.

Fold the top of the foil and crimp to seal. Arrange packets in a single layer on a rimmed baking stone.

Bake until fish is opaque, 10 to 12 minutes if thawed, 18 to 20 minutes if frozen.


Disclaimer

Monday, July 7, 2014

Grilled Chicken and Peaches with a Curried Tomato and Shallot Vinaigrette

As I was reading through a stack of magazines this weekends, I found several recipes that I was anxious to try. One recipe that I saw was for grilled chicken with curried peaches. It caught my eye because of the use of fruit in it. After actually reading the recipe, I knew I had to change it up because in the recipe I clipped, the peaches were not grilled. I am a fan of cooked fruits in my main dish, so I simply had to modify. My husband was a little bit skeptical of the peaches (and maybe the word curry), but after trying one of the peaches decided that he liked it even better than the tomatoes (have I mentioned that he is a huge fan of fresh tomatoes in dishes). I liked the idea that the vinaigrette gets added to the cooked chicken, rather than serving as a marinade. It really helped make the chicken tender and flavorful. We served it over brown rice, which absorbed the vinaigrette and also had a nice flavor.

This recipe is a definite keeper for my family.


Grilled Chicken and Peaches with a Curried Tomato and Shallot Vinaigrette
Serves: 4

4 boneless, skinless chicken breasts
3 tablespoons olive oil
salt
pepper
1 tablespoon cider vinegar
1/2 teaspoon curry powder
2 peaches, pitted and cut into wedges
2 tomatoes plum
1 shallot thinly sliced

Directions:

Preheat gas grill.

Brush 1 tbsp of olive oil on peaches and chicken. Salt and pepper the chicken.

Grill chicken until cooked through. At the same time, grill the peaches, offset from the heat (on shelf or side of grill opposite flames). If you want to give it some grill lines, you can put it directly over the heat for the last couple of minutes but they get warmed through and tender offset from the heat.

In a large bowl, whisk together vinegar, curry and the remaining 2 tbsp of olive oil. Season with salt and pepper. Add tomatoes and shallots. Set aside.

When the chicken is done, arrange on a platter. Add the peaches to the vinaigrette and toss gently to coat. Spoon the mixture on top of the chicken.

Top with chopped parsley or cilantro, if desired.

Disclaimer

Wednesday, May 28, 2014

Chicken Taco Cups

Whether you are looking for an appetizer, a quick dinner, or just a different way to enjoy the taste of tacos, Chicken Taco Cups are a great option. I love how easy they are to make and everyone can top theirs just the way they want.

Chicken Taco Cups
(makes 24 cups)

1/2 pkg wonton wrappers (the brand I use has 48 in a package)
1/2 cup shredded cheese
8 oz chicken, shredded

taco toppers

Place your wonton wrappers into a mini muffin pan that has been sprayed with cooking spray, folding to form a cup.
Bake at 350 for about 5 minutes.

Combine your shredded chicken and cheese in a small bowl and mix together.

Fill your cups with the mixture, dividing equally between the cups.


Bake for another 5 minutes, until the cheese is melted and the filling heated through.

Serve with chopped tomatoes, lettuce, onions, sour cream and all of your favorite taco toppings.

I used the shredded chicken that I make up for chicken tacos, so it was preseasoned. Alternately, you could use cooked chicken and chop it up into small pieces - if so, I would add taco seasoning. The recipe would also work with ground meat or beans, if you want a vegetarian option. If your filling meat is pre-cooked, this meal can be ready to eat in about 15 minutes - perfect for those busy sports filled nights.

These were a hit with the family and next time, I will make up a second pan by doubling my filling recipe.

Disclaimer

Monday, March 3, 2014

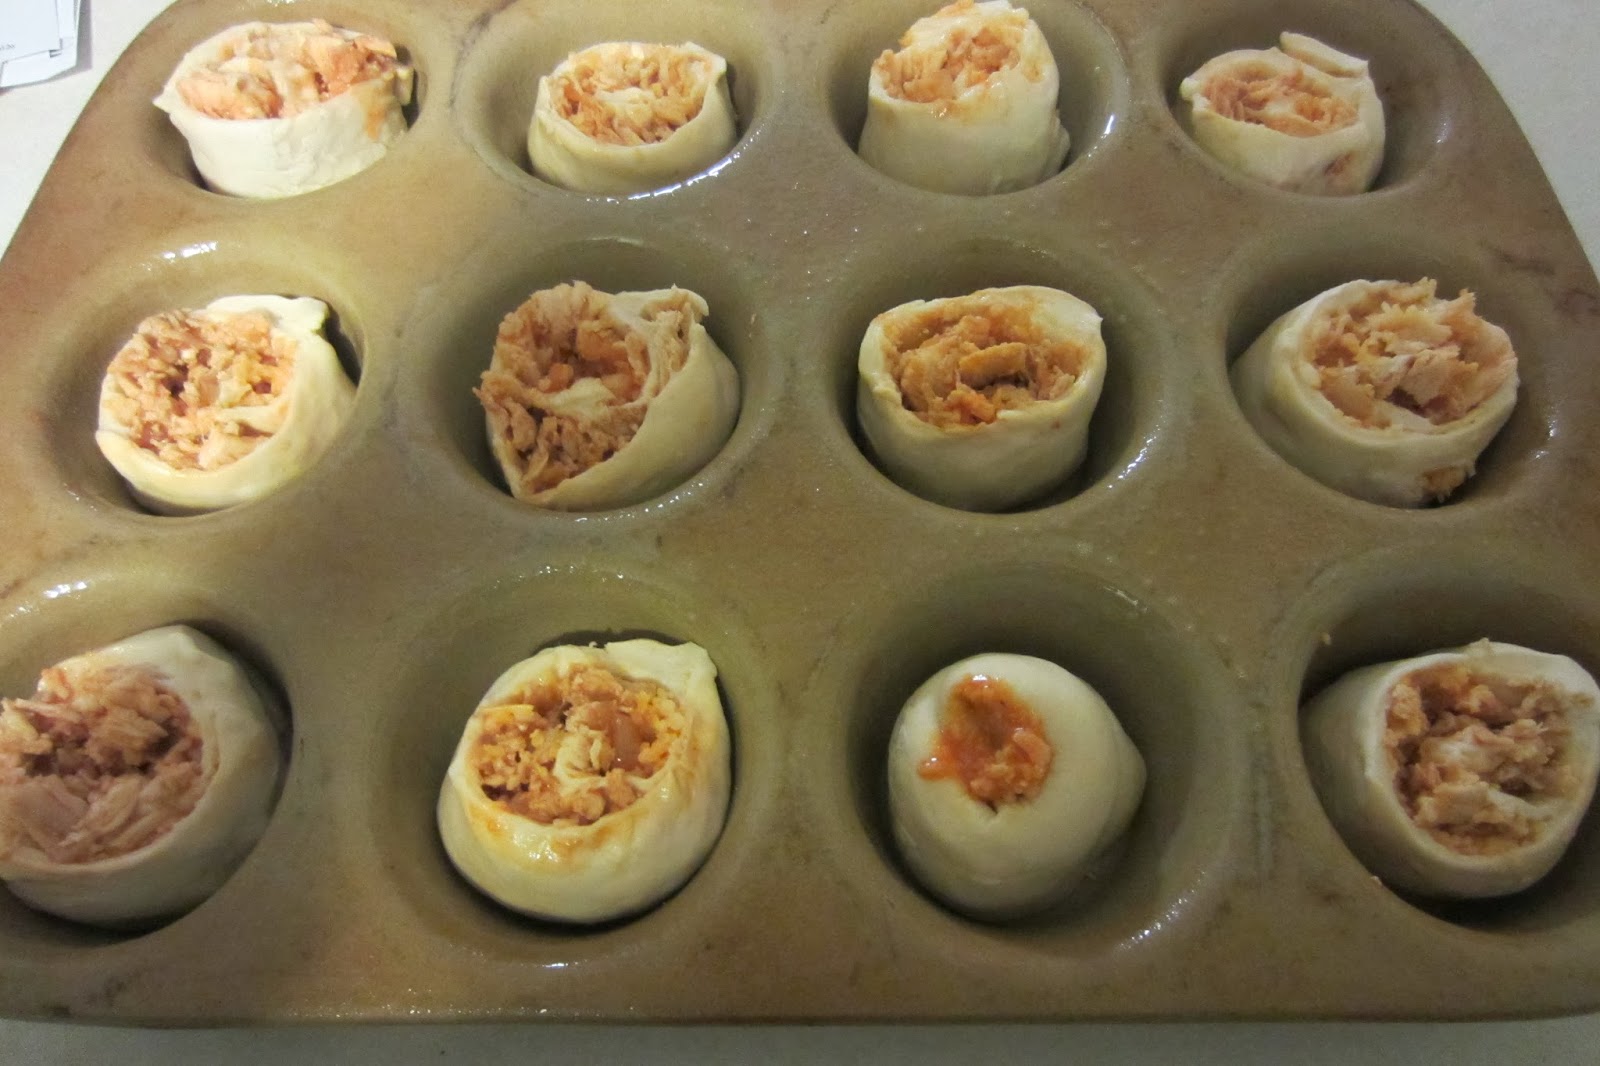
Buffalo Chicken Cupcakes

I might sound a bit like a broken record, but we enjoy the flavor of buffalo chicken wings at our house. The reality is though that they are not only messy to eat, but also not the lowest calorie food option that there is. So, we continue to look for new ways to enjoy the flavor of wings, without the mess and without fewer calories. Buffalo Chicken Rolls, Buffalo Chicken Sliders and Buffalo Chicken Soup are some of our favorites.

Tonight, we tried a new recipe that I had found on Pinterest for Buffalo Chicken Cupcakes. I tweaked it a bit, using a little less on some ingredients, making it simpler by using thawed bread dough and using shredded chicken that had cooked in my crock pot all day.
The family loved them. My daughter sprinkled them with shredded cheese and called it 'sprinkles' on her cupcake. My husband drizzled additional buffalo sauce on top. We decided that this would be a fun way to enjoy standard pizza toppings and soon we will make the 'cupcakes' with pepperoni, tomato sauce and cheese...or maybe we will serve the sauce on the side. I put them in my recipe software and found that each cupcake was about 158 calories - not too bad for a satisfying dinner that delivers on the buffalo flavor.

Buffalo Chicken Cupcakes
Yield: 12 cupcakes

1 loaf frozen white bread dough, thawed
1/2 cup chopped onion
1 tablespoon butter
8 ounces shredded chicken breasts
1 cup shredded Cheddar cheese
1/3 cup buffalo sauce

Preheat oven to 400.

Saute chopped onions in butter over medium heat. Once transparent, add shredded chicken and buffalo sauce. Heat for 5 minutes. Remove from heat.
Roll (or press) the dough into a large rectangle.

Sprinkle the cheese over the dough, leaving 1" on the one long edge so you can seal it.
Spread the chicken over the cheese.
Starting from long side of dough, begin rolling the dough up like a cinnamon roll. Pinch ends when done.
Slice into 1 1/2 to 2 inch rolls. Place in muffin tin.
Bake for 15 - 18 minutes.

Disclaimer

Monday, January 13, 2014

dare I say - The Perfect Grilled Cheese

If you had asked me to provide examples of 'recipes' that I would likely never do a post about, I think that grilled cheese might have been amongst them. Sure there are hundreds of ways to make grilled cheese, as you can mix up your bread, your cheese and even add other toppings like tomatoes or ham. I know that there are entire restaurants devoted to the grilled cheese sandwich. (as an aside, there is a cereal restaurant too that allows you to 'custom' mix your choice of cereals - wonder if they are still around)

I have been making myself grilled cheese for years and was very content with my method. It was never as good as those that you would have out, but it was still satisfying and the perfect mate for a bowl of soup on a cool day.

Then, the other day, my friend shared this article with me about how to make the perfect grilled cheese sandwich. So, when I was home with the kids enjoying a snow day, I decided to give it a try. Let me confirm that it did not disappoint. It was crispy and yummy!

So, really at the end of the day, this recipe is less about the components and more about the technique. I have made it with "regular" sliced bread and Italian bread from the bakery. I have made it with American Cheese and Jalapeno Cheddar Cheese. I've left it just cheese and added bacon to my sandwich. I imagine it will work well with most types of bread and cheese. I'm thinking Texas Toast with Feta and Bacon is on my list to try soon.

1. Select your bread - whatever is your favorite or you have on hand will work.
2. Butter both sides of your bread. (the second side can be tricky, I usually wait until I have it in the pan to do the other side)
3. Brown both sides on a griddle/in a skillet.
4. Transfer the bread to a sheet pan.
5. Top each side with your cheese.
6. Bake at 350 for about 5-10 minutes, until your cheese melts.
7. Flip one piece on top of the other to build a sandwich.
8. Cut in half (aren't they just better that way).
9. Enjoy!

The resulting sandwich is just wonderful. It is crunchy on the edges. It is soft and gooey on the inside. It has that subtle taste of butter.

I don't think I can return to my old style of making a grilled cheese.

What type of toppings do you like on your grilled cheese? What combination will you try first?

Disclaimer

Sunday, January 12, 2014

Chicken Paprikash with Dumplings

I am always on the hunt for new ways to enjoy familiar favorites. Lately, I have been doing a lot of my exploring of new recipes on Pinterest. For the most part, I look at what my friends are posting and check them out.

The other day, when I was scanning through recent pins by my friends on Pinterest, I came across a post for Chicken Paprikash. Anytime I hear the words Chicken Paprikash, I can't help but think of scene from When Harry Met Sally when they are talking funny and he says that there is too much pepper in my paprikash. Can you believe that movie is 25 years old this year? I need to not know things like that, it makes me feel old!

Anyway, I don't know that I had ever had Chicken Paprikash and after reading the recipe, I decided I would give it a try. I changed things up a bit when I prepared it. I started making my dumplings in the water, but they say seemed to lack flavor, so I decided to just prepare them directly in the broth/gravy. I also used less sour cream than the original recipe called for.

Chicken Paprikash

Serves: 8

Ingredients:
1 tablespoon olive oil
1 small vidalia onion
2 tablespoons paprika
1 whole chicken, cut into pieces
water
4 chicken bouillon
1 cup light sour cream
1/4 cup flour
2 teaspoons seasoned salt
3 eggs
2 1/4 cups water
4 1/2 cups flour
1 teaspoon salt

Directions:

In a large pot, or pressure cooker, saute the onions in the olive oil over medium heat. Cook until transparent. Stir in the paprika. Add the chicken and brown on each side. Add water and simmer for 30 minutes (or cook in pressure cooker). Remove the chicken to a strainer to allow to cool. In a small bowl, combine sour cream, flour and seasoned salt. Whisk in to the broth at a low heat and allow to thicken. Separate the chicken and put back into the broth. Raise to a medium heat. Combine eggs, water, flour and salt in a bowl. Drop by the spoonful into the boiling broth. Allow to cook about 10 minutes. Ladle into bowls to serve.

The dish was enjoyed by my husband and I. My son made a comment, before even tying a bite, that he didn't like chicken, so my daughter immediately decided she didn't like it either. That is okay, I will make it again, as I am confident that they like it...my son ate a good portion of his. When I packed up the leftovers, there was a lot of the broth/gravy, so I froze that and will add cooked chicken to it for a future meal.

I also came upon this recipe, when I found the YouTube video above. It incorporates tomatoes, which I think could be interesting.

Disclaimer

Wednesday, November 27, 2013

Pizza Sticks

It always seems that we get stuck in a bit of a rut when it comes to meal planning. It's not that we don't eat a variety of items, it just seems that every few weeks, I get to the point where nothing sounds exciting and I struggle to plan a menu. Which is something that I hate - it really is so much easier to go into the week with a plan than it is to wing it. The good news is that sometimes, those weeks lead to new ways to enjoy familiar food. The other week, as we were trying to clean out the fridge before vacation, was one of those weeks. I knew the things that I had to use up, but we were so busy planning and packing for vacation, that I never really looked at what I had to lay out a menu plan. Fortunately, one night this lead to a new meal/snack for our menu - Pizza Sticks. We paired it with salad for a nice balanced meal, but they would be great for snack time too. I might consider cutting the biscuits and cheese in half and making smaller portions for a snack or appetizer.

Pizza Sticks
1 can refrigerated large size biscuits (we used Grands)
8 servings string cheese
pepperoni, optional
pizza sauce (we make our own with tomato sauce)

Preheat oven to 350.

Flatten the biscuit, long ways. Place a row of pepperoni along the biscuit, if using. Top with string cheese.
Roll the biscuit around the cheese, being sure to seal the seam and to seal the ends.

Place on a baking sheet, leaving space between the sticks. Bake for 18 minutes.
Warm the pizza sauce and serve with the pizza sticks.
(Tried to cut one in half, but realize that it doesn't really show the gooey cheese center very well)
Disclaimer

Monday, September 23, 2013

Braised Short Ribs

Last weekend, we went out to dinner with friends and I tried a meal that included braised short ribs, some fish and polenta. The fish was okay, but the short ribs were amazing. I decided that it was a meal that I would love to make at home. So, as I tend to do, I did a search on the internet. No one recipe that I found was really quite what I was looking for, so in my typical style, I combined several recipes to get to one that worked for me.

I forgot to buy the polenta, so we served it with rice and corn on the side. I used the braising liquid to make a quick gravy to serve as a sauce for the meal. The meal was met with great feedback from the whole family.

I think that next time, I might swap out my braising liquid and use 1 cup strong coffee and 1 cup beef broth or 1 cup red wine and 1 cup beef broth. I definitely will try making it with polenta too.

Braised Short Ribs
Ingredients:
2 pounds boneless beef short ribs
1/4 cup flour
salt
pepper
1 tablespoon olive oil
1 tablespoon minced garlic
1 medium onion, diced
10 Roma tomatoes, chopped
1 teaspoon thyme
12 fluid ounces soda pop
1/2 cup beef broth

Directions:

Preheat oven to 325.

Dry the ribs off, season with salt and pepper and dredge in flour.
Pour the olive oil into a skillet over medium-high heat. Brown the ribs, about 5 minutes on each side.

Place the garlic, onions, tomatoes, and thyme in the bottom of a roasting pan.
Top with the ribs and then pour in the pop and beef broth.
Cover tightly with foil.

Place in the oven for 3 hours. Allow the meat to rest for about 5 minutes before serving.

Disclaimer

Tuesday, August 20, 2013

Penne Rustica

There are many meals that we make at home that are based off of restaurant dishes. Perhaps one of our favorites is our version of Penne Rustica, which is based off the dish of the same name from Macaroni Grill. This dish is full of flavor and when made with milk, is reasonable in calories too. According to the Cook'n software calculation, this recipe, which serves six is only 378 calories per serving. For such a flavorful and satisfying dish, I feel like this is a great amount of calories. And with six servings, there is enough for dinner and leftovers for lunch.
Penne Rustica

Ingredients:
2 tablespoons butter
2 tablespoons garlic chopped
3 tablespoons Marsala wine
2 1/4 cups milk
1 cup Parmesan cheese
1/2 cup chicken broth
1 tablespoon cornstarch
1 tablespoon Dijon style mustard
2 teaspoons chopped rosemary
1/2 teaspoon salt
1/2 teaspoon minced, fresh thyme
1/4 teaspoon cayenne pepper
2 ounces prosciutto chopped
2 chicken breasts
12 ounces penne prepared, al dente
3 tablespoons grated Parmesan cheese
1 teaspoon paprika
4 sprigs rosemary

Preheat oven to 500.

For the sauce: saute butter, garlic, and rosemary until garlic begins to brown.
Add Marsala and cook for 5 minutes. Add the milk, Parmesan cheese, chicken broth, cornstarch, mustard, rosemary, salt, thyme, and cayenne pepper. Whisk until smooth. Bring mixture to a simmer and keep it there for 10 minutes. Cover sauce and remove from heat.

Grill chicken until cooked through. (I frequently use my grill pan and a bit of liquid smoke, when the weather doesn't permit grilling outside.

For the Penne Rustica: in a glass or ceramic dish, combine pasta, chicken and prosciutto.
Add sauce and stir. Top with Parmesan Cheese and Paprika.
Bake for 10-12 minutes, or until top is browned.
Remove from oven. Garnish with fresh rosemary sprigs, if desired.

You can always split the dish between several ramekins and make it as individual dishes as well.


Disclaimer

Friday, August 2, 2013

Tomato Basil Pasta

Recently, while exploring Pinterest, I have been seeing a lot of Pins for 'one pot wonder pasta'. It really sounded like a simple and tasty option. I figured it could be good on its owned or enhanced with a bit of grilled chicken. I liked that it all cooks in one pot, so the pasta absorbs the flavor of the broth and tomatoes. I used this version as my source.

The family really enjoyed this. I served it with my homemade French Bread. My son was hesitant at first to try it, but wound up eating the whole bowl that I served him.

Tomato Basil Pasta
Serves: 6

12 ounces pasta
1 (15-ounce) can diced tomatoes
1 large onion, julienned
4 cloves garlic
1/2 teaspoon red pepper flake
2 teaspoons dried oregano
2 sprigs basil chopped
4 1/2 cups vegetable broth
2 tablespoons olive oil

Place all of the ingredients in a large pot, in order, drizzling the oil on top.
Cover pot and bring to a boil.

Reduce to a low simmer and keep covered and continue to cook for about 10 minutes or until most of the liquid has evaporated, stirring occasionally.
Season to taste with salt and pepper. Serve with Parmesan cheese.

Disclaimer

Monday, July 15, 2013

Chicken Enchilada Pasta

Even though it has been busy lately and we haven't been having typical meals, I was finding myself without appealing ideas for dinner this week, so as I sat down to do my menu planning, I clicked around on Pinterest. One meal that I found that sounded very good to me was Chicken Enchilada Pasta, which had been Pinned from The Kitchen Life of a Navy Wife.

Much like my Taco Stuffed Shells, I liked how this dish combined to family favorites, Mexican and Pasta. I made it for dinner, incorporating a few minor tweaks to the recipe to lighten it up. By my approximation , there are about 12 servings of the sauce, each with about 140 calories. So, with our typical pasta added, it is about 350 calories per serving. I think the extra sauce would freeze fine and of course, would work well for a leftover meal later in the week.

It was voted a definite keeper by all.

Chicken Enchilada Pasta

2 boneless, skinless chicken breasts
2 tablespoons olive oil
2 cloves garlic minced
1 medium onion minced
1 red bell pepper diced
1/2 anaheim pepper, diced
1/2 teaspoon salt
2 teaspoons chili powder
1 teaspoon cumin
20 ounces green enchilada sauce
2/3 cup red enchilada sauce
1 cup shredded Cheddar cheese
1 cup light sour cream

Pasta

Garnishes: tomatoes, jalepenos, green onions, sour cream, shredded cheese

Cook chicken, chop and set aside.

Boil pasta according to package.

Heat olive oil in a deep skillet and cook onions for 3-5 minutes. Add garlic and red pepper. Cook for another 3-5 minutes. Add chicken, green chiles, cumin, chili powder, salt, and both enchilada sauces. Let sauce simmer for about 8-10 minutes.
Add cheese and stir until the cheese is melted and heated through. Reduce heat. Slowly add the sour cream. Stir until sour cream is well mixed and heated through.

Drain pasta.

Serve pasta topped with chicken enchilada sauce and garnish with desired toppings.


Disclaimer

Saturday, June 29, 2013

Shredded Buffalo Chicken Sliders

Last weekend, we were driving home from Cedar Point after a visit that was cut short by a crazy storm. Along the way we passed a couple of Buffalo Wild Wing restaurants (or BWs, as I have always known them). It sounded so yummy to me, that I knew that I wanted to fit buffalo chicken into my menu last week. At first, I thought I would make buffalo chicken rolls or wontons, but then I decided to try a different route and make a shredded chicken in buffalo sauce. I have a bag of bread flour that I need to use part of so that I can fit the rest in my container, so I decided that I would make my slider rolls using my everyday bread recipe.

Shredded Buffalo Chicken

4 boneless, skinless chicken breasts (about 24 ounces)
1 packet ranch salad dressing mix
2 tablespoons butter
1 bottle (5 fl oz) Frank's Red Hot buffalo sauce

Place ingredients in crock pot on low for 6 hours.

Shred.


Homemade Slider Rolls

1 cup warm water (110 F)
1/3 cup sugar
3/4 teaspoon salt
2 tablespoons canola oil
3 cups bread flour
2 1/4 teaspoons active, dry yeast

Sprinkle the yeast on top of the warm water. In a mixing bowl, place 2 cups of the flour, sugar and salt. Pour the wetted yeast and water into the bowl and stir. Add additional flour, about 1/4 cup at a time. When the dough starts to come together, turn out onto a floured surface and knead for about 5 minutes, until the dough is smooth. Place back in mixing bowl, rub on a little canola oil and cover with a damp cloth. Let it rise for about 30 minutes, until dough doubles in size.

Separate dough into 16 rolls (approx 1.5 oz each) and place on baking sheet. Let the rolls rise for about 30 minutes. Then, bake at 350F for 30 minutes.

After the rolls have cooled, slice in half and top with the shredded chicken.

This meal got the thumbs up from the family and is sure to be part of future menu plans.

Disclaimer

Tuesday, June 4, 2013

Rattlesnake Pasta

When it comes to pasta, we have a lot in our house. In order to not feel like we eat the same meal over and over again, we like to try out new recipes. This recipe is based off of a recipe that is (was?) on the menu at Pizzeria Uno. It is pretty much a chicken Alfredo with jalapenos. Normally, I would mix the jalapenos and a little bit of the liquid that they are in directly into the Alfredo, but since my daughter doesn't like spicy foods, I garnish with them and spoon some of the liquid into each dish.

I have tried to pull out some extra calories, by using milk instead of cream and by reducing the amount of butter that is used. Still, this dish is a 'treat' at approximately 500 calories per serving with the sauce and pasta.

Rattlesnake Pasta

12 ounces boneless, skinless chicken breasts (about 2)
1 tablespoon butter
1 tablespoon Italian seasoning
2 cloves minced garlic
3 tablespoons butter
2 cloves garlic
1/3 cup flour
1 teaspoon salt
1 teaspoon ground white pepper
3 cups milk
1/2 cup grated Parmesan cheese
8 ounces shredded Cheddar Jack cheese
4 ounces jarred jalapeƱo peppers sliced
1 box penne pasta

In a large skillet over medium heat combine chicken, 1 tablespoons butter, garlic and Italian seasoning. Cook until chicken is no longer pink inside. Remove from skillet and set aside.

Cook penne pasta to al dente and drain.

Make a roux: Melt 3 tablespoons butter in the skillet. Add garlic. Stir in flour, salt and pepper; cook 2 minutes stirring constantly. Slowly add milk and half-and-half, continue to stir until smooth and creamy. Stir in Parmesan and Cheddar Jack cheeses; stir until cheese is melted.

Stir in chicken.

Serve over prepared Penne pasta and garnish with Jalapeno pepper slices.

Disclaimer

Wednesday, January 16, 2013

Pretzel Chicken with Mustard Cheese Sauce

I am always on the look out for things that are a little different to include in my weekly meal planning. It is so easy to get stuck in a rut, making the same dishes over and over.

At our house, we eat a lot of chicken for dinner, so having variations on preparation is key. The other week on Pinterest, I came across a recipe for Pretzel Chicken on Simply Made with Love. It sounded tasty to me, so I decided to give it a go (with a few tweaks of course!).

The recipe called for frying the chicken, but I prefer to give it a quick pan fry to get the crust and then to finish baking it in the oven. It takes less oil to make it this way, and I have to think that is healthier (but I could be wrong). I made the full recipe for the sauce, but had enough over to use it as the cheese portion of the filling for the chicken enchiladas I made the next night. The sauce below is a half portion, which is what I will make next time.

The meal was a hit with the kids and my husband.
Pretzel Chicken
2 boneless, skinless chicken breasts
1 1/2 cups salted pretzels (I used mini-twists)
salt and pepper
2 eggs
1/3 c milk
2 tbsp olive oil

Preheat oven to 350.

Put the pretzels in a sandwich bag and using a mallet, crush them until you have crumbs. Place the pretzels in a shallow dish and season with salt and pepper.

Cut each chicken breast in half and pound with a meat mallet to make the pieces an even thickness.

In a shallow dish, beat the eggs and add the milk.
In a large saute pan over medium heat, heat the oil.

Dip each chicken piece into into the eggs and then into the pretzels. Add to the hot oil in the pan. Cook until the pretzels begin to brown and then flip over.
Remove from pan and place in an oven safe dish and bake for 20 minutes, until chicken is cooked through.

Mustard Cheese Sauce
1 tablespoon butter
1 tablespoon flour
1/2 cup milk
1/2 tablespoon spicy mustard
1 cups shredded sharp cheddar cheese

In a saucepan, melt the butter. Whisk in the flour and cook for 1 minute. Whisk in the milk and the mustard, and cook until slightly thickened. Stir in the cheese. Season with salt and pepper, if needed.
Serve the chicken with the Mustard Cheese Sauce.

Disclaimer